Showing posts with label Halloween market Stall. Show all posts

Wednesday, 26 October 2011

The Halloween Market Vine


Halloween is approaching fast, so I thought I had better get a move on and finish off my story about the making of my Halloween Market! :0)

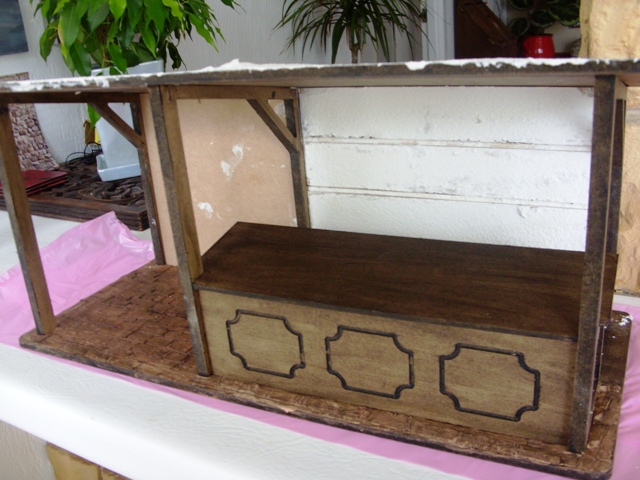
With the market stall fully assembled, it was time to begin adding those little details that make a project special. I began by adding some fun halloween card embellishments. They were the perfect size for the front of the stall and being adhesive backed, they held firmly in place with little persuasion.


Once they were all on, the market looked a little bare on the left hand side, so I decided to make a vine to curl up the pillar. I love making vines, they are time consuming, but easy to make, you just need a steady hand and lots of patience! ;0)


I used florists wire covered in florists brown tape to make the vine stem. The tape is easy to apply, you just wrap it around the bottom of the wire and twirl all the way up to the top! ;0)

When I was happy with the shape and size of the stem, I glued and clamped it to the pillar and left it overnight to dry. I did 'plant' some grass at the base of the pillar whilst I was waiting... you all know by now how inpatient I get waiting for glue to dry!!!!

The next evening, I started to apply the leaves to the stem. I have a metal punch with three different shaped leaves to cut and for this vine, I chose an Acer shaped leaf. I had already cut lots of leaves out, so I started to apply the leaves, one by one, using a tweezers and a dab of PVA glue. After ten minutues of painstakingly, carefully applying each leaf, the tweezers got thrown, my fingers became excess glue wipers and the leaves went on in an hickeldy pickedly fashion... but ... it worked :0)

I decided to use two different sized leaves of three colours on the vine: a darkish green, a light green and a splattering of copper orange :0)


For each leaf, I decided to mark out leaf veins. I did this easily as I went along, just before applying each leaf, I used my thumb nail to create the 'vein' line...


The finished vine......


For this vein, I just used coloured art card with no special finish, but to make the vein even more authentic, you can handpaint the veins on the leaves using acrylic paints and then when dry, apply a thin coat of non- yellowing clear varnish.  I have painted and varnished my Ivy leaves, so you can see the difference. I like the both looks, I think it adds variety :0)


and so my Halloween stall is finished, I just need to dress the shelves and front now...

Back soon :0)


Hats by Kat ;0)


This is post copyright to the author. It may not be re posted, reprinted or distributed without express written permission of the author.

Monday, 17 October 2011

The Halloween Market Roof


The market stall has a flat roof which slopes down slightly towards the back of the stall. Looking straight at the market, you can't really see alot of the roof as your eyes are always drawn towards the inside of the stall, so I decided not to do alot with the roof and to have it quite plain.

I started with a bumpy layer of art mache and left it to dry for a couple of days. Then I painted on a coat of Jacobean Oak Wood stain.


Once that had dried thoroughly, I played around adding a few patches of Burnt Umber and Holly Green Acrylic paint, mixed loosely together to give an uneven colour. Preferring this look, I decided to paint the roof with the acrylics instead, so wood staining the roof was a waste of time, but it's good to try out these different colours and methods. I have used this method on flagstones before and it worked brilliantly for the look I wanted in that project. 


When the roof was totally dry, I added a vine which I will show in my next post, but here is a snippet of it against the new look roof colour.


HALLOWEEN GIVEAWAY

In my last post, I promised a Halloween Giveaway and to be honest I have been so busy with other commitments that I haven't had time to sit down and decide fully what is going in the giveaway and to then take photos.

I have stitched some Halloween cushions ....


and I have made up some little autumnal and pretty pots, scrolls, envelope bundles, etc, but I appreciate that not all my followers have wizard scenes, so maybe they wouldn't be interested in scrolls and feather pens!   

So, for my giveaway, the winner will get to choose one of my Halloween cushions and they will also get a 'Lucky Dip' bag of goodies, depending on their choice of scene... wizard or pretty.


TO ENTER MY GIVEAWAY, YOU MUST;

  1. Be a follower of my blog
  2. Leave a comment here on this blog post so I know to enter you :0)
  3. Pop a link to this blog on your blog
  4. Pop over to the AIM Blog and become a follower to the AIM blog
I hope lots of you will join in with my blog giveaway. All entries must be in by midnight on wednesday the 19th and I will draw the winner on Thursday 20th October, hopefully then your parcel will reach you before Halloween.


AIM

 Most of you will know that I am a very proud member of AIM... Artisans In Miniature. As well as their infomative Directories of artisans and their wonderful free Imag, AIM also has a blog.

If anyone is wondering why I have included the AIM Blog in my giveaway, it is because I have recently volunteered to manage the blog and post links to the AIM imag and showcase many of our lovely members and their collectors quality miniatures. So I would love your support there and to see you become followers. Everyone who participates in AIM gives their time for free, so your support is greatly appreciated :0)

Julia xx


This is post copyright to the author. It may not be re posted, reprinted or distributed without express written permission of the author.

Wednesday, 12 October 2011

The Halloween Market Wall


With the floor dry, it was time to play around with the back wall of the market. To the side is a nice open space, ideal for a wizards meeting place, so I wanted the back wall to look suitably old and realistic. I deliberated over whether to have aged wood,  brick or plaster and whilst pondering I rooted around for something else in the depths of my mini DIY box and found....... stone wall effect PAPER!!!!
And very realistic it is too ;0)

Now, it's not your normal dollshouse paper, it is laser printed, embossed and even looks practically 3D in real life. I bought it some time ago at Hobbeycraft in the Card Making and Embellishments section. Not that I make cards, but you can sometimes pick up some pretty or useful bits and pieces that are meant for card making, but work equally well for miniatures.  


As the market is for me and will not be going on sale, it didn't matter if I cheated and used paper for my back wall and I think it suits the look I wanted for the market totally :0)

With the paper glued in place, I fitted the market stall together and left it all to dry overnight.


So now that the market stall is coming together, I have stitched a few cushions for Halloween and this got me thinking.....


Is anybody out there interested in a Halloween giveaway? I think I may be doing one next post ;0)

Julia xx


This is post copyright to the author. It may not be re posted, reprinted or distributed without express written permission of the author.

Monday, 10 October 2011

The Halloween Market Floor


As the market stall has a side part where the floor is totally visible, I decided I wanted to go have a go at making my own clay tiles! Now I am venturing into hubby's domain here and I must say, he's only helpful when it comes to criticism LOL  He will happily tell me where I am going wrong or how awful it looks, but he's not so forthcoming with advice on how 'get' the look!!! Men ;0)

Anyway, out came the clay (Terracotta colour Air Drying Clay) and I started to roll it out (like pastry) with a small rolling pin... only to find it stuck to the rolling pin and broke up in patches!! After half an hour or so of re-rolling again and again, and some not very lady-like words(!) hubby finally 'suggested' that I add some water to the clay!

Now this worked :0)
With wet hands, I could smooth and coax the clay into the bumpy and sloping floor I wanted and then I 'borrowed' one of hubby's shaping tools and marked out my 'cobbles'... which was met with fits of laughter from hubby! :0(


Ok, it's not as good as his cobbles, but he's had years of practice and I didn't think they were that bad?!
Anyway, my poor cobbles were so upset by his uncharitable laughter that they disappeared right back into the clay and I started again... this time with help of a Bromley Crafts flagstone template that I found buried in his workbox!

The templates are designed to be used with brick compound and not with clay. So I pressed the template hard into the clay and then gently peeled it back up. This gave me a feint line of the flagstones which I could use as a guide for most of the flagstones. Some didn't show through, but it was easy from here to judge how the missing flagstones should look in size and shape. I used the shaping tool again to mark out the lines and ok, I agree, they do look better like this! 


I had intended to leave it dry overnight, but I was bored after an hour, so I dug out my Jacobean Woodstain that I had used on the woodwork and applied a coat to the clay, leaving some thicker areas in between the flagstones in patches. I was really pleased with look and this time I did leave it alone to dry properly.


The photo below, shows it the next day, when it has totally dried out :0)
I have left the side that is hidden behind the stall itself as plain stained wood. I may add wooden floor planks here in the future.


and this it with the market stall in situ. I think it looks ok for a first (or second) attempt at doing my own flooring... look out hubby... lock up your clay, I know how to do it now ;0) LOL


Julia xxx

This is post copyright to the author. It may not be re posted, reprinted or distributed without express written permission of the author.

Thursday, 6 October 2011

The Halloween Market


Happy with the 'dry run' of the market stall, it was time to take it all apart again and begin decorating! 

Our first job was to apply the paper mache to the roof and back wall of the market. As this market stall is the larger one, we have an open area to one side, so I left that plain as I have a little plan for a slightly different look there!  


After applying the paper mache, I cleaned out the shelf grooves. I have found that this is better done before the paper mache dries as it is easier to scrape wet paper mache out, rather than chip out dry paper mache.


Happy that the shelves would slide back into their grooves nicely, I let everything dry overnight, then the next day, I applied a coat of 'Teabagging' to the back wall.


If you look closely at the above photo, you will be able to see that the teabag split!!!
Don't worry if this happens, it blows off nicely once dry and leaves some slightly darker patches which add to the ambience!! :0)


With the woodwork parts of the market stained with Jacobean Oak Woodstain, the market was starting to come together very quickly. So next I had to decide on a floor.......

Julia :0)


This is post copyright to the author. It may not be re posted, reprinted or distributed without express written permission of the author.

Saturday, 1 October 2011

A project perfect for Halloween


Well, it's the first of October already and wow, has this year flown.
It's also been very busy with a house move of our own, a house move for our eldest daughter and the start of GCSE examinations for our son!

But.. now everything is settled (fingers crossed) it is time for me to settle comfortably into an autumn and winter of miniatures :0)

Both hubby and myself have been quietly playing around with new ideas for our miniature houses and peeps that 'chat' with me on FB will have seen our Christmas project under construction....

But first, let's have some autumn mini fun and make a special little project just for Halloween.....

Last years halloween project was the Halloween Shed, which I had immense fun making and really loved the finished look... then I went and sold it! So this year, I wanted to make something similar, but I also wanted it to 'house' my halloween cushions and pumpkins.... so........ 

During my recent visit to Miniatura, I picked up this large market stall kit by The Dollshouse Builder


Having bought from this seller previously, I knew that his kits are of good quality and the 'dry run' of the kit was perfect. This market won't be for sale, it will have pride of place on my dresser for Halloween and it will be the 'photo shoot backdrop' for my cushions ;0) 


But... if you would really like a market stall of your own, then click on the link above and grab yourself a market (no... I'm not on commision LOL ) and follow my blog through October as I show you step by step how I decorated my market stall. 

Julia xxx 


This is post copyright to the author. It may not be re posted, reprinted or distributed without express written permission of the author.