Showing posts with label Maple Confectioners. Show all posts

Monday, 27 December 2010

A new Wizard and Witch for Maple and Pear Confectioners


Well, Christmas has been and brought new residents for Hazel Hill...... may I introduce the sweet maker Wizard and his wife....Oswald and Matilda Pear.


They were both commission made for me by Joy of Adora Bella Minis but they were my miniature Christmas present from hubby and the children, so I wasn't allowed to see them until Christmas day... but, they arrived when Hywel was in work, so I had time to check the box contents and have a sneaky peek before he whisked them away to be hidden until Christmas! LOL


The brief was for a wild haired, rotund sweet seller, with goofy teeth and freckles and her equally wild haired wizardly husband! :0)

Oswald makes the sweets in the shop and he is wearing a sparkling white apron.. for now! It will eventually be covered in sticky sweet hand smudges, as Oswald always forgets where he put his towel and so wipes his hands on his apron after making his new sweets!


Oswald's wife, Matilda enjoys tasting the sweets, hence the teeth!! She will shuffle around the shop, tidying shelves and dusting her collection of pretty teapots, which I am going to collect and show on the back shelves behind the counter!


They both suit the sweet shop perfectly and all our visitors on christmas day, loved them :) 


They are brilliant characters and really suit in with my ideas for the sweet shop. This is going to be a fun project, with many a learning curve if I am going to add any of my own sweets making attempts to the shelves... I may just stick to making boxes!!!


This is a longer term project for me to slowly add to over the coming year, so no quick results on this one, sorry, but it will pop up occasionally when I am on the hunt for someone to swap sweets with me (wink wink) or when I have added a little something to the kitchen area behind Oswald or bought myself a teapot for Matilda :)


But, for now, it is sitting happily on my dresser filled with christmas cakes and cookies, making everyone smile :)

Hope you are all having a wonderful christmas break and enjoying your christmas presents too :0)

Julia xxx


This is post copyright to the author. It may not be re posted, reprinted or distributed without express written permission of the author.

Saturday, 18 December 2010

Maple & Pear Confectioners ~ Interior decorating and shop fitting!!!

Well we have got on wonderfully with the sweet shop, although, we have been working on it all evening from teatime till midnight!! Still, I think it's looking great and it's ready for my wonderful xmas pressie from the children (wink wink) and for my 2011 projects of sweet making, which I may add I am absolutely hopeless at! LOL

Anyway, here are some photos of the inside, all ready for me to fill over the coming months....

My first job was to paint the interior walls and I used the same chalky peppermint green emulsion which I have used on the window panes.


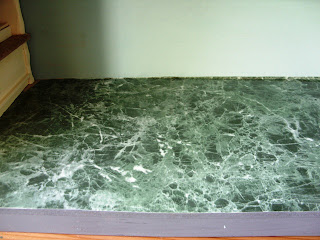
When that had dried I put the flooring down. This floor is green marble look sticky back vinyl!! I was going to lay individual mosaic floor tiles, but I found the vinyl when rummaging for something else in the garage and it was just perfect :)


Hywel has busily been making me some shop shelves and counters. This time he used plain pine for the carcass as I wanted to paint it and it would be a travesty to paint meranti, although he insisted on using meranti for the lower shelves, which I waxed.

Here they are in progress...


I made sure he notched out the edges of the counter, I think it softens the look...


Once they were all made, Hubby painted the edges in Craig And Rose Chalky white and I added some strips of dolls house wallpaper below the bottom shelves


Oh, I nearly forgot... before putting the floor down, I painted the ceiling in the dark green of the bays and front door and sprinkled a few little gold stars on the wet paint that had come off the tinsel Janice had wrapped around my fabulous give away present. They will probably fall off after a few days, but they look quite festive at the moment!


So there it is, just the door to put back on and its all ready for chocolate fountains, candy floss and sweets :)


 Just have to sit here and wait for christmas now :)


I hope everyone who has snow is staying safe and warm and doesn't have to venture out too far. We had more snow overnight and there is more forecast for tonight, so the car is firmly parked up and the legs have to walk to the shops! LOL


Our little cat Pumpkin loves the snow and whilst the sun is out, it is hard to get her to come in....


Back next week with pics of the Olde Abbey at Christmas and Santa's Cabin :)

Julia xxx

This is post copyright to the author. It may not be reposted, reprinted or distributed without express written permission of the author.

Thursday, 16 December 2010

The Sweet Shop Exterior Part 2


With my camera batteries now fully recharged, here are more photos of the exterior walls of the sweet shop for you :) After swirling white acrylic paint on the side walls, I used a wet, scrunched up piece of kitchen roll to smudge the white into the grey. The walls were then left to dry fully before I 'teabagged' the whole lot! I didn't apply too much of the tea wash to all areas, just enough to give it that older look in corners. I then left it all to dry overnight.


I also painted the steps with a black/grey palette. I put a dab of black and a dab of grey on my palette and then just lightly took up a bit of each colour and applied it to the step without mixing the colours together. The colours then mix in a streaky manner as the brush is moved over the surface.


Finally, I varnished everything when it was all really dry and I had finished adding green acrylic, speck by speck... that takes sooo long to do LOL 

I use normal Interior Matt Clear Non -Yellowing Varnish to seal it all.


Here are the pillars either side of the door. I'm a bit stuck as to what to put here... I don't like the over door mantle, it is too low and I don't want to hide too much stonework, so what can I put on the top of the pillars? Some sort of sweet jar maybe?


And I finally decided on the name! I played around late last night with the lettering and Maple & Pear Confectioners fitted the window bays perfectly...


So with just the front door to paint and age now, I can move onto decorating the inside..... another day! :)

Julia xx


This is post copyright to the author. It may not be reposted, reprinted or distributed without express written permission of the author.

Wednesday, 15 December 2010

Maple and Pear Confectioners? ~ The Sweet Shop Exterior Part 1


Okay, I know, this project is supposed to be my 2011 project and here I am starting it already... but I have an excuse... I was bored :( The days are long with everyone in work or school and just me, the cat and the dog home alone all day! Plus, we have a big commission to work on in the coming weeks and I will be showing that stage by stage... plus I am keeping my fingers crossed that the doctors will let me go back to work in the new year.....so..... I thought I'd start my sweet shop posts now, you don't mind do you?? ;0)

So... first a name???? Well I liked Maple but didn't know what to put with it. Maple Confectioners I like, but is the name long enough?! Maple Syrup Confectioners?? No, too sugary.... Maple and Pear Confectioners?? I like that one, but I want to make labels and sweet boxes with the name on them, so it could be too long... oh, I'm getting so indecisive! LOL

Anyway, I will keep thinking about the name and concentrate on the building whilst I am doing it :) First, I took the front door off, it's easier to paint off. Then I took the mantle above the doorway off, it had been glued on too low down and I wasn't happy with it.. but goodness knows what glue they used, it was sooo hard to get off!!

Then I painted all the exterior walls dark grey.


Then hubby got to work on it, starting with Art Mache, he put the stone work in patches on the front and one side of the building. The stone is slightly grey because he added some grey emulsion paint to the art mache when he was making it up.


The next day, when it had all dried, I painted the window bays, frames and pillars. I used the Craig and Rose 1829 Chalky Emulsion paints again.. I love these paints ;)


That evening, Hubby added the layer of plaster to the exterior walls...


The plaster is good old DIY Decoraters Pollyfilla, which was white, but I forgot to take a photo before I painted it dark grey.. sorry!


I then left this to dry overnight and hubby got on with making some shop shelves. Can you see them through the window? He's busy trying to make me a sink unit tonight!! What do I need a sink unit in a sweet shop for... well... you'll have to wait and see ;0)

So.. on with the walls.... this is the bit I love.. adding all the ageing...

With an old plastic container, I added a few drops of white, black, burnt umber and green acrylic. I only mix in patches, so I have a varied palette of aging colours. I then use a thin pointed end artist brush to begin to build up the colours on the stone. I also tend to keep a pot of water nearby, so that I dip my brush in and then pick up some colour if I want the colour to look slightly lighter or smudged.... if you get what I mean!


I painted the stonework on the front ...


Then with a larger paintbrush I added a layer of burnt umber in a swirling action on the plaster and before this dried, I blotted wet kitchen roll all over the paint. This smudged the colour and worked it into the uneven finish of the plaster.


After all this had dried, I did the same with a mix of 60% white acrylic paint and 40% water.

You can see it below, before I worked it all in with the kitchen roll.


And that's as far as I have got with my photos! I will take more soon :)

Hope you like it so far :)

Julia xxx

This is post copyright to the author. It may not be re-posted, reprinted or distributed without express written permission of the author.